Tuesday, June 30, 2015

Baby, Butterfly, Birthday!


Hello and welcome,
I made a few cards over the last week but haven't had time to do posts about each one so I decided to do one post with several different cards in them!

This first card is a stamp I found (again) at a thrift store and I bought it for the sole purpose of practicing my Copic coloring!  I did a simple version here for a boy with blues and greens. Now I don't have a lot of Copics so it's tough getting the colors to blend well. I added some vellum hearts because there was that little blank space on the lower right that needed something to finish it. The sentiments are from Winnie & Walter and Papertrey Ink combined.


This next card is the beautiful butterfly from Stampin' Up on black cardstock! I used embossing ink and some blue Perfect Pearls to add shimmer. I cut it out of the black cardstock and added it to a Stampin' Up kraft cardstock. I stamped some thrift store stamps (yes, again!) and added some blue bling to match. I thought this might be good for a graduation card or someone who is going off to college or out on their own for the first time.


This last card is one I remade after doing some of it in a local card shop card class. I rarely use pattern paper and ever rarer use pink on a card! I don't know the cardstock base or pattern paper company as it was included in the class. It's hard to see but the hearts are glittery pink and I hand drew the strings. The "happy birthday" are die cuts from black foam using Clearly Besotted dies.

Thanks for joining me! God bless your day!
~~~~~~~~~~~~~~~~~~~~~~~~~~~~~~~~~~~~~~~~~~~~~~~~~~~~~~~~~~~
Supplies:
Stamps: Winnie & Walter (hello), Papertrey Ink (baby)
Paper: Stampin' Up (kraft), Hero Arts (tide)
Ink: Colorbox (primary), Hero Arts (white pigment)
Accessories/Tools: MISIT, Vagabond, Copics
~~~~~~~~~~~~~~~~~~~~~~~~~~~~~~~~~~~~~~~~~~~~~~~~~~~~~~~~~~~
Challenges:
Kathy Racoosin's 30 Day Color Challenge 2

Monday, June 29, 2015

Happy Hydrangea...

Happy birthday hydrangea

Hello and welcome,
I did this card a few days ago. It's a hydrangea stamp I rescued from a thrift store! I inked the top in distress ink purple and the bottom in distress ink green and stamped it on Strathmore cold press watercolor paper. I used distress markers and a Wink of Stella pen that I had added water to to color with. I'm obviously still learning my watercoloring technique! I went for a very purple hydrangea this time (my last one was blues and purple and can be found here because it was before I started blogging). The background is watercolored as well in distress blue. I used an older Stampin' Up greeting and kraft cardstock too.

It would have been a good card for my mom because she loved purple, but I lost her almost two years ago... that's when I changed my favorite color to purple... in her honor!

I've been being kept busy learning a new job and so hope to get a couple of posts up during this week! I also have a moose post to put up with more moose with twin calves video! Stay tuned!

God bless and have a great day!

~~~~~~~~~~~~~~~~~~~~~~~~~~~~~~~~~~~~~~~~~~~~~~~~~~~~~~~~~
Supplies:
Stamps: Rubber Stampede (hydrangea), Stampin' Up (sentiment)
Paper: Stampin' Up kraft
Ink: Ranger Distress inks, markers
Accessories/Tools: MISTI, bling
~~~~~~~~~~~~~~~~~~~~~~~~~~~~~~~~~~~~~~~~~~~~~~~~~~~~~~~~~~
Challenges:
Kathy Racoosin's 30 Day Color Challenge 2
Simon Says Stamp Wednesday Challenge: Anything Goes
Simon Says Stamp Work It Wednesday: Refreshment (flower tending is refreshing to me!)

My daughter turns 25... night sky card!


Hello and welcome,
So my youngest daughter, Hannah, turns 25 on July 1st! She is a Trekkie and a Whovian (Dr Who fan). I did this night sky scene about a month ago in playing around and hadn't decided what to do with it. I decided since she's a space lover it would behoove me to use it for her card!

The background is a lot of different distress inks and some Perfect Pearls for shimmer, white gel pen for faraway stars and splatters of white pearl and silver paint. I used some embossing paste (my first time after having it for a year!) for the stars and colored it with silver paint from Adirondack. I did smear some of the paint under the star stencil and actually threw away my first attempt! But I persevered and like what I ended up with!


I die cut the numbers, ampersand and "awesome" from heavy weight black and white cardstock and stacked the numbers. All the black got a coat of Wink of Stella to add to the shimmery night time effect, even around the border! I adhered the night sky panel to black foam to pop it up and then to a heavy weight black cardstock base.

I added a Dr Who quote on the inside in white gel pen:
"We're all stories, in the end. Just make it a good one, eh?" (Season 6, Episode 4)

I think she will like it! Happy 25, Hannah!!

Thanks for stopping by and God bless!

~~~~~~~~~~~~~~~~~~~~~~~~~~~~~~~~~~~~~~~~~~~~~~~~~~~~~~~~~~~~~~~~~~~~~
Supplies:
Paper: Gina K Designs (black), Neenah Solar White 80#, Strathmore watercolor
Ink: Ranger distress inks
Accessories/Tools: Vagabond, Wink of Stella, sequins, Adirondack paint, Wendy Vecchi embossing paste
Dies: Avery Elle? (numbers), Memory Box? (letters)
~~~~~~~~~~~~~~~~~~~~~~~~~~~~~~~~~~~~~~~~~~~~~~~~~~~~~~~~~~~~~~~~~~~~~
Challenges:
Kathy Racoosin's 30 Day Color Challenge 2
Simon Says Stamp Wednesday Challenge: Anything Goes

Sunday, June 28, 2015

It's all about YOU...

All about YOU!
Hello and welcome,
So I've had embossing paste for about a year now and have never used it! Yesterday was the day to experiment! I did several versions using the paste and different stencils! I need practice with smoothing it out and getting it even though. I have a few spots that are thinner than others.

I've had this card in my head for awhile now. I've always loved cards with sun rays on them and thought it would be fun to have a bold YOU with the rays representing different sweet sentiments about YOU! I also saw awhile ago that either Jennifer McGuire or Kristina Werner had sprinkled microfine glitter on embossing paste and had some I wanted to use it on. I learned a few things along the way about embossing paste!

So here's the process I used: I used Wendy Vecchi translucent embossing paste and colored it with distress ink. I mixed it on my mat and used a 12 inch sun rays stencil. I laid the stencil over my 80 lb cardstock (mistake #1... use heavier cardstock!) and taped it down with micro-pore tape (mistake #2 de-sticky the tape first on your arm or clothes... it left sticky residue behind on all the cards I used it on!). I really had to work this embossing paste to get it smooth... it seemed not very smooth when it came out of the jar (maybe too old!) and so I worked it to get a smoother consistency. Then I started spreading it around! I realized that I was trying to be too stingy with the paste and should have made more than I needed to get good, even coverage. There are a few spots on the rays that aren't as full as the rest!  When I took the stencil off I was pleased with how the rays turned out so I quickly washed the spatula and stencil. I then sprinkled microfine glitter over the paste. I let this dry about 1 hour while I did other stencils with more paste (you'll see those in later posts!).

Shimmery sun rays up close

I love my Avery Elle stamps and die set "Simply Said You" and use it often. I picked out six sentiments from the set and stamped them in between the yellow rays using my MISTI stamp tool (I stamped them all at once!). I also die cut the YOU from black foam to be in the lower corner for all those rays/sentiments to come from. I knew I needed a stronger cardstock base for that heavy embossing paste panel and so used 110 lb weight. I cut down the panel and adhered it some white craft foam to pop it up and then adhered it to the card base. I used multi matte medium to adhere the YOU in the lower left corner.

I love how this turned out! It was a lot of work but worth it to me! I don't have anyone in mind to give it too and I may end up selling it on my Etsy shop... whenever I get time to set it up!

You'll be seeing the other embossing paste cards I did as I finish them!
Thanks for sticking with me this long! God bless your day!
~~~~~~~~~~~~~~~~~~~~~~~~~~~~~~~~~~~~~~~~~~~~~~~~~~~~~~~~~~~~~
Supplies:
Stamps: Avery Elle Simply Said You
Paper: Neenah solar white 80#, 110#
Ink: Ranger Mustard Seed
Dies: Avery Elle Simply Said You
Accessories/Tools: MISTI, Vagabond, Wendy Vecchi embossing paste, Elizabeth Crafts silk microfine glitter "Cool Diamond", Hot Off The Press stencil, Micropore tape, Ranger multi matte medium
~~~~~~~~~~~~~~~~~~~~~~~~~~~~~~~~~~~~~~~~~~~~~~~~~~~~~~~~~~~~~
Challenges:
Kathy Racoosin's 30 Day Color Challenge 2
Simon Says Stamp Wednesday Challenge: Anything Goes
Simon Says Stamp Work It Wednesday Challenge: Refreshment (Sunshine is so refreshing after winter!)

Thursday, June 25, 2015

Fun Blog Hop from Paper Smooches!

None of my cards posted on this post but wanted you to know about a fabulous blog hop with Paper Smooches products! Get inspired and see what others have created with this fabulous line! PLUS enter to win a $25 gift code to add to your stash!


Here's the details:

It’s Pep Rally week of the NEW Paper Smooches JULY release!  TWO new stamps and TEN new dies will be available to purchase on June 30th at 8:00pm pacific time.   

To find out how to win the prize – a $25. gift code to choose what you like at the PS online store start the blog hop here at Laura Bassen's blog . Have fun!

Sunday, June 21, 2015

Father's Day Moose...

Moose Father's Day for my husband, Kevin.
Hello and welcome! I know it's been several days since I've blogged but I've started a new job and orientation and training has taken all my time... and I come home exhausted to boot! I have a few cards to show but wanted to do this one today.

I knew I had to get a Father's Day card done for my husband. Two nights ago we had a little incident with a moose in the neighbor's yard you can see in the video on my YouTube channel. (I figured out how to upload to YouTube!)

We have seen more moose in the six months we've lived in the Butte than in all 26 years in Haines! My husband was locking up his bike to a tree after a ride the other evening and heard rustling coming from next door about 20 feet away. He just figured it was the neighbor doing something in his own yard... so he glanced quickly over to just make sure... like you have to do in Alaska... and there was this moose munching on a tree. She wasn't even paying any attention to Kevin and he watched her for a minute before coming in the house to get me. I came out with my phone (camera) of course, and we watched her for a couple minutes while I filmed her. We had a four foot fence and a few bushes and small trees in front of us and if she moved our way we could back track quickly. We didn't even think she'd jump the fence. But lo, and behold, she wanted more delicious looking leaves on the other side of the neighbors fence and lightly, easily leaped over it to get to them. Then we laughed and realized our fence would be just as easy to step over. We let her go on her way eating unconcernedly! Life in Alaska... you gotta love it!

Close up of moose, trees and Butte


So I decided a moose card was in order for Kevin's father's day card. I've used this moose stamp in my first two blog posts and decided I just wanted his head to be peeking into the card. I love the look of watercoloring so much but am not very good at it but I do keep trying and practicing! On Strathmore cold press watercolor paper, I used Ranger distress inks in blues, greens, and browns for the sky, mountain (my quick version of the local Bodenburg Butte) and the ground. I stamped the Misty Mountain rubber stamps moose profile in Ranger Archival black ink. Then using the same ink I stamped the pine trees. ( I'll have to find out from what company! I thought it was Stampin' Up Lovely As A Tree but the tree in that set is larger!) I used distress markers to color in the moose, trees and ground under the trees and the trees on the Butte.

I then die cut the one of the WPlus9 Happy Trio words out of the sky and stacked 4-5 layers of white "happy"s before adding the die cut one to the top. In some photos it looks inset rather than popped up! I used the Winnie & Walter stamp set the Big & the Bold & the Happy to add the "father's day" to finish it. I mounted the panel on Neenah Solar White 110 lb cardstock for stability leaving about 1/4" white border on all sides.

Close up of popped up "happy"
Kevin was very pleased. And so was I! I do love watercoloring with distress inks because they reactivate and react with water so well... I tried with regular (albeit cheap!) watercolors and it doesn't react the same way. So onward with distress inks!

Thanks for stopping by and God bless! Happy Father's Day!

~~~~~~~~~~~~~~~~~~~~~~~~~~~~~~~~~~~~~~~~~~
Supplies:
Stamps: Misty Mountain (moose), WPlus9 (Happy die) Winnie & Walter (father's day)
Paper: Strathmore watercolor cold press, Neenah Solar White 110 lb
Ink: Ranger Archival black, Ranger distress inks & markers
Accessories/Tools: MISTI
~~~~~~~~~~~~~~~~~~~~~~~~~~~~~~~~~~~~~~~~~~
Challenges:
Kathy Racoosin's 30 day color challenge 2
Simon Says Stamp Wednesday challenge: Favorite Technique (watercoloring with distress ink)
Inkspirational Challenges: Wild

Friday, June 12, 2015

Butterfly mess or masterpiece?!

Glitter pens butterfly
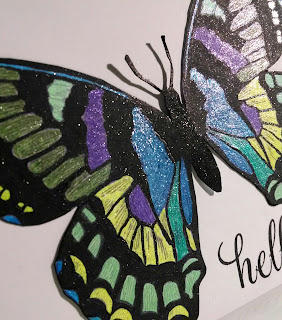
This was one of those cards that I thought I was just going to have to throw away! I originally stamped the Stampin' Up butterfly in a purple Ranger distress ink to watercolor it... but forgot it wasn't on watercolor paper until AFTER I tried to watercolor it! So next step... add Wink of Stella to some of the areas I had watercolored... it just made it look like a glittery mess! Finally decided to go with Sakura glitter pens I've had for ages! Different, wild colors! That made it look better but it still had the purple outlined butterfly. So a black Copic to the rescue! Did you know that the Wink of Stella pen still shows up shimmery after having Copics on it?? I didn't until I started coloring it! I love the effect! After adding the black... POW!... it jumped off the page! I fussy cut it out and attached it to a Neenah 110 lb solar white card base. Here's a close up picture of the glittery colors!

Close up glitter
Papertrey Ink "hello" adds elegance, I think! I do adore butterflies, don't you?

Thanks for stopping by and God bless!
~~~~~~~~~~~~~~~~~~~~~~~~~~~~~~~~~~~~~~~~~~~~~~~~~~~~~~~~~~~~~~~
Supplies:
Stamps: Stampin' Up (butterfly), Papertrey Ink (sentiment)
Ink: Ranger distress, Ranger archival black
Paper: Neenah solar white
Accessories/Tools: MISTI, Sakura glitter pens, Copic black marker, Wink of Stella clear shimmer pen
~~~~~~~~~~~~~~~~~~~~~~~~~~~~~~~~~~~~~~~~~~~~~~~~~~~~~~~~~~~~~~~
Challenges:
Addicted to CAS: Butterfly
The Card Concept: Butterfly Effect
The Daily Marker: 30 Day Color Challenge 2
~~~~~~~~~~~~~~~~~~~~~~~~~~~~~~~~~~~~~~~~~~~~~~~~~~~~~~~~~~~~~~~
Challenge #37 winner

Wednesday, June 10, 2015

Green fern

Fern  - have a wonderful day


So the reason I told you I was starting this blog was to be able to "try out" for card design teams. That's what this post is about! I came across The Card Concept from another card blog that I follow. I saw that they were looking for new design team members and decided I had nothing to lose to apply! To apply, you had to look at past challenges and choose one to create a new card and describe why you want to be a designer!

So I'm using their challenge #36  and this is the photo for inspiration:


What I saw was a lot of white and a little green. I've had lots of "styles" since I started making cards but I ALWAYS come back to loving clean and simple designs. My style isn't always as clean and simple as I envision but it still is what attracts me and, in fact, most of the card blogs I follow are pretty strictly clean and simple designs. I'm definitely NOT a layer upon layer type person!

So with this card I am applying to be a Clean and Simple designer for The Card Concept! As the saying goes, nothing ventured, nothing gained!

I do have to show you a close up of the fern because it's so classy with the subtle glimmer of watered down Wink of Stella! (My photo taking and editing skills will get better as I blog!)

Close up Wink of Stella glimmer

Thanks for stopping by and God bless!
~~~~~~~~~~~~~~~~~~~~~~~~~~~~~~~~~~~~~~~~~~~~~~~~~~~~~~
Supplies
Stamps: Stampin' Up (fern), Avocado Arts (sentiment), Kitchen Sink (swirl)
Paper: Neenah Solar White 110 lb
Ink: Memento Luxe Pear Tart
Accessories/Tools: MISTI, Wink of Stella clear pen
~~~~~~~~~~~~~~~~~~~~~~~~~~~~~~~~~~~~~~~~~~~~~~~~~~~~~~
Challenges:
As You See It - #090-One Layer
Simon Says Stamp Monday Challenge - For the Love of Plants

Monday, June 8, 2015

Colorful Fish in a sleepy blue ocean...

Rainbow fish

Welcome! I've changed it up a bit and made a fish card instead of a moose card.

I found this stamp at a local thrift store and decided he needed rescuing. It was a pretty dirty stamp so after cleaning it up I unmounted it from the wood block to use with my MISTI (Most Incredible Stamp Tool Invented) stamp tool. And I did need to stamp him several times for good coverage on the Ranger watercolor paper and that's where the MISTI shines!  I'm not sure the kind of fish this is but I decided he needed to be in bright blue water (thanks to Ranger distress inks and Perfect Pearls for shimmer) and he himself (I'm assuming it's a he since most "he's" in nature are the more flamboyant colored) is as colorful as you can get! I used a Colorbox rainbow pad to stamp him and he's glittery everywhere there is color with a Wink of Stella glitter pen. I used sequins again *gasp* for his eyes (a clear and a green) and bubbles. I also added Ranger enamel in black for his pupil in the green sequin. I was going to give this a bold message but wanted him to take center stage so I made it just a sweet simple message from Papertrey Ink.

Thanks for stopping by and God bless.
~~~~~~~~~~~~~~~~~~~~~~~~~~~~~~~~~~~~~~~~~~~~~~~~~~


Supplies:
Stamps: Papertrey Ink Mega Mixed Messages (Sentiment), Unknown (fish)
Paper: Ranger watercolor, Neenah Solar White 110 lb
Ink: Colorbox Primary Pigment
Accessories/Tools: MISTI, Wink of Stella clear pen, Ranger distress inks (Mermaid Lagoon, Salty Ocean, Mowed Lawn, Dusty Concord), sequins, Perfect Pearls spray mist
~~~~~~~~~~~~~~~~~~~~~~~~~~~~~~~~~~~~~~~~~~~~~~~~~~~
Challenges:
Kathy Racoosin's 30 day color challenge2
Simon Says Stamp Wednesday: Masculine
Seize the Birthday: Animal
Just Us Girls: Summer JUGS#296
Virginia's View Challenge: Ombre or Monochromatic

Saturday, June 6, 2015

I know... another moose!

Thanks everyone for stopping by and seeing my first blog post a few days ago! I'll try to keep you entertained enough to come back!

Our current residence is a haven for moose... especially a mama moose with two very small twin calves. There's also an older "calf" (that was kicked out due to current calves coming along) who wanders through. So I'm on a moose kick especially after finding this stamp!

Happy Father's Day Moose


I told you you'd see this moose stamp again! I just can't help it! I colored him with several brown Sakura glitter pens (the glimmer is not really showing up in this picture) and then used Ranger distress inks on the background. I used the older Stampin' Up Inspired by Nature set for the reeds and the kraft cardstock it is attached too. The sentiment is from Winnie & Walter's The Big, the Bold and the Happy set (I adore all Winnie & Walter sentiments!).

I colored this for Kathy Racoosin's 30 day color challenge... it inspires me to color when there's a challenge!

Now I'll try not to do another moose for a few days... in fact I was working on tropical fish today so you'll see that one in the next post!

God bless your day and thanks for reading!
~~~~~~~~~~~~~~~~~~~~~~~~~~~~~~~~~~~~~~~~~~~~~~~~~~~~~
Supplies:
Stamps: Misty Mountain Stamps (moose), Winnie & Walter (sentiment), Stampin' Up Inspired by Nature (reeds)
Paper: Neenah Solar White 80 lb, Stampin' Up Crumb Cake
Ink: Ranger Archival Black, Ranger Distress Inks (Crushed Olive, Mowed Lawn, Salty Ocean, Broken China, Walnut Stain, Black Soot)
Accessories/Tools: MISTI, Sakura glitter pens in browns
~~~~~~~~~~~~~~~~~~~~~~~~~~~~~~~~~~~~~~~~~~~~~~~~~~~~~
Challenges:
Simon Says Stamp Wednesday Challenge: Make it Masculine

Friday, June 5, 2015

Hello from Alaska and welcome to my blog!

So I've finally stepped into the world of blogging! My husband has been encouraging me to blog about the cards I create and just about some of our daily life happenings in a small town in Alaska! Not sure if anyone will ever read this but I thought I might as well get the first post out there! My art business is called Forget Me Not Designs so I thought my blog should be called the same with the added Alaska to catch all that Google search traffic! I make cards, paint animals on rocks and teach One Stroke painting when I can (I'm a One Stroke Certified Instructor). And now I'll even add a card I made today to prove I make them!

Moosing You...
I colored this card for Kathy Racoosin's 30 day color challenge that started again on June 1st. This moose stamp from Misty Mountain Rubber Stamps will get lots of use by me in the upcoming weeks!  I colored him with a brown distress ink marker and used distress ink to color the background as well. (I'll be learning how to add links to products used as I learn to blog!) I just wrote the message in my handwriting because I was trying to be funny... moosing you instead of missing you! (Did you get that or did I have to explain it!). I actually used sequins *gasp* that I found at a thrift store that will last me years! It has an all over shimmer with Perfect Pearls mist.

Thanks for taking the time to read this!
God bless your day!